Showing posts with label New to Me 2016 @ Celtic Thistle Stitches. Show all posts

Tuesday, December 13, 2016

Snowmen, dogs and foxes hang out in my back yard :D

I took this picture while the snow was coming down, lol.  Here are 3 snowman drawstring gift bags (tutorial here) that I made for Christmas gifting purposes :D  I want to make more of them so I ordered more large buttons from Ebay - it's way cheaper than buying them @ the fabric store in town :D  These will be uploaded to the Bag It challenge (ending December 16), and will go also go in Ho Ho Ho for December (when the link goes up) :)

 I've been making Batman capes for my niece, for her son's 5th birthday party next month :)  I think having a Batman party qualifies mom for the Coolest Mom Ever award!  I believe the superhero himself will be visiting - for some reason I wish I was a 5 year old boy now, LOL!  These ones are all size 6 ...


Here are a few more of the capes - the 3 on the left are size 4, then there's a size 2 and one of the size 6's.  


Here are all the capes that are completed (I have 12 done of 16 needed), hanging out on the clothesline for their photographic debut.  The penultimate one, far right, is shy, so he's showing off his lining instead of his emblem ;)


 A couple of Christmas gift pillowcases - dogs (left) and foxes (foxii?  ;D) (right) :)
A close-up of the dog fabric ...


... and a close-up of the fox fabric.  This print seems to dance and wiggle when I try to take a picture - like some prints I've seen, it doesn't like having it's picture taken!  It's mini foxes :D

I spotted a cute pin yesterday and got it made less than 24 hours after I found it :D  Tutorial is here, and includes a downloadable template for Rudolph :D  His nose, by the way, is a fluffy pom pom ;)  I think this is a great bag design for the gentlemen we know and love and have trouble shopping for!  Rudy counts as #26 in my not-very-successful 52 in 16 attempt (52 new bag designs in 2016) - I still have 18 days left in 2016 to complete 26 more bags - where are the sewing elves when I need them :D


Linking up to several linky parties with these projects:
Reindeer bag will go to New to Me, Ho Ho Ho and On We Sew, and Bag It.   The snowman bags will go to Ho Ho Ho and Bag It.  The pillowcases go to Ho Ho Ho, and the Batman capes won't be going anywhere other than Stittsville, Ontario (when I get the last 4 finished) :D


Saturday, December 10, 2016

Reindeer and stuff! *rubs hands together with glee* :D

 I think I need to create some cuter finger (and hand) puppet holders, lol. Frixion pens in thread spools are serviceable - but not very cute!  And these reindeer puppets are definitely cute, IIDSSM :)  The pattern is a freebie from The Red Boot Quilt Company - you can download it from Craftsy or from the Red Boot website :)  She did hers as ornaments - I left an opening in the bottom of mine to make finger puppets :D

 Snowman flex frame bags - I used the snowman fabric (from Walmart in the States) to make a Santa sack for a great nephew, and with some of the scraps, I whipped up several flex frame bags.  The tall one in the middle will be the packaging for a gift of a 3pk of Lindor chocolates ... and a gift card :)

 When I did my first batch of rocket puppets I wasn't pleased with how they turned out - they were just too plain.  I wanted them to go with a solar system bag for a solar/rockety themed gift.  I whipped these up and am very pleased with the results - they're cute :)  Although - when I looked at the original rockets just now, to get the link to the page, I didn't think they were all that bad, LOL!   Absence apparently makes the heart grow fonder!  ;)


 Another finger puppet here - Mr. Chickadee :)  I've had this website bookmarked for quite a while because she has an awesome collection of tutorials - aka Susan's Critters  and Susan's Birds :)  Someone pinned the chickadee pattern recently - I whipped this little one up last night - and as usual, finger puppetized the ornament pattern ;)  I'm thinking of doing more bird puppets for a gift for next year, so I'm going to put this one away until I can get more made.  I think a collection of bird puppets (or ornaments) along with a bird watching book for kids, would make an awesome gift!  Presented in a drawstring gift bag, of course, embellished with a bird or two :D

 From the &!#$ happens files, this is what can happen if you're winding a bobbin on a sewing machine that does the winding at superfast speed.  I wasn't watching the bobbin - I was probably looking at the TV, and this is what happened, LOL.


Needless to say, I wasn't going to pick out the loopy thread to try to salvage the thread at the beginning of the wind - I pitched this puppy in the garbage can with nary a thought, and wound another one - on a metal bobbin, LOL.  Watch your bobbins, ladies - sometimes life hands you a bobbin nest!  ;)

I took some pictures this morning of some pillowcases and drawstring bags I've completed in the last few days - it was snowing out but still fairly mild - quite a pretty day :)  I sent the pictures to my laptop from my cellphone, but they haven't arrived yet so I'll post them later.  They're all Christmas gifts as well :D

Flex frame bags are being posted to Bag It - the challenge closes in a few days (December 16, 2016) so if you're entering or are thinking about entering, get cracking!  ;)  The gifts (everything but the thread nests - those are for my own personal entertainment purposes :D) will be posted to Ho Ho Ho for December (when the linky goes up), and the reindeer puppets will go to the New to Me linky when IT goes up :)

Wednesday, November 30, 2016

I can now close down November :D

More Christmas sewing -  I tend to assembly-line projects when it's something I like - it saves time, and uses up a nice lil bit of stash.  Here are a few projects I've finished this month in multiplicate :D

First up - more Eunice bags - I've now made 9 of them, at last count.  These are Christmas gifts for my neighbour girls - they'll have other goodies tucked inside (stickers etc.) :)

Eunice bags
Wallets - tutorial here - I did some of these last year for Christmas gifts, and this year I'm doing some for the kids that didn't get one last year.  Some of them will get goodies tucked inside - gift cards or maybe even a little bit of $$$ ;)

Kids wallets
Close-up of the inside of the wallet

Snowman hand puppets!   I used this pattern, but I sewed mine together - I don't actually make *glued* projects, generally - it's great for kids, but I prefer something a little more permanent :D  These are for some neighour kids - I'm going to make one of my snowman drawstring bags (tutorial here) to hold them - I think it's very appropos :D

Snowman hand puppets
I'm not very happy with my rocket finger puppets - things went awry from the first moment I started them, and didn't improve as I continued to work on them. They're too plain, and there's a problem with the ric rac on some of them - I'm just not pleased with the finished items, and will be making a new set.  Not everything works out well, and these fit that description :D  (The pattern for the rocket is from a Rocket Toss game I bought on Craftsy years ago - it's no longer available)

Rocket finger puppets - not a success, lol
Christmas gift pillowcases :)  Nice stash busting (about a meter per case), quick to make up (even with all the raw seams zigzagged) and best of all - useful :)   I hope the kids like them :)
3 kids pillowcases - ants, ants and ladybugs 

Close-up of the ladybug fabric (from Fabricland)

Close-up of the red ant fabric (Fabricland)

Close-up of the blue ant fabric (Fabricland)

Recently I posted a picture of some Eunice bags I had finished up - one of the bags was made with soccer fabric (from Joanns).   These 2 items will be tucked in that soccer bag - a wallet, and a flex frame bag - I wanted to use up the scraps, and I thought these would be fun for an 8 year old boy :)

Flex frame bag and wallet front

Flex frame bag and wallet back

That's it for now - I'm tempted to take a break, but I have lots of things I could be working on - and besides - sewing is fun :D  I'll be back in Santa's workshop dungeon tomorrow, I expect, working away on something :D

Linking up with several linky parties:
- Ho Ho Ho and On We Sew for November (all of these items, lol)
- New to Me for November (snowman and rocket puppets - a success, and a fail!)
- Bag It - the 2 Eunice bags :)


Tuesday, November 29, 2016

Ladybug ladybug - fly away home :)

Quicky post, as I have to get some finger puppets finished up today, and I haven't even printed out the pattern, oops!  I just finished this project off, and I'm so pleased with it that I had to post it right away :)

Ladybug drawstring bag :)
Presenting ... ladybug drawstring bag :D  The tutorial is here - I printed out her pattern - I printed it out scaled to fit my paper (8.5" x 11"), proportionately, then increased the size by 50%.   My bag finished to 8" tall x 8" wide.  The wings are separate from the main body bag, but I tacked them down at the very bottom so they'd sit in place nicely.  The black dots are little sequins I stitched onto to the wings :)  If I can say so myself without sounding boasty, this is a mighty cute ladybug bag, and officially counts as #25 in my "52 in 16" goal.  I'm pretty sure I won't reach my goal in the next 4 weeks, LOL, but at the very least, I should pass the half-way mark?!  :D

Drawstring bag and finger puppets :)
These are the finger puppets I finished up that needed a cute storage bag to keep them corralled :D  This set of goodies is part of a Christmas gift for a 4 year old girl - her brothers' gifts are almost finished as well, and will be posted when I get them finished :D

All the puppets and the ladybug bag are new projects for me, so I get to post them to Fiona's New to Me for this month ... and since they're Christmas gifts as well, they qualify for Ho Ho Ho for November as well - YAY ME :)  ETA:  Oh yes!  The ladybug bag is going in the Bag It challenge - I almost forgot!

OK!  Butt off computer and back to sewing machine in 3 ... 2 ...

;)


Thursday, November 24, 2016

Sleigh bells ring - are you listening? :)


Christmas sewing!

Drawstring gift bag - appliqued with this lil lady ... 

I'll just pop these into the drawstring bag and *poof* - gift done!
Owl hand puppet tutorial is from Sewn Together by Jenny Doh
Finger puppet pattern was available to Good Critters newsletter subscribers - it may not be available any longer.
The book is from Amazon :)

Not a Christmas gift, but a donation bag - a floral toiletries bag :)  I call it a toiletries bag because I have toiletries from the dentist that I don't use so I save them and donate them in a pretty bag :)

A finish-up-some-scraps pleated pouch :)

3 more Eunice bags - these are all Christmas gifts :)  When I have all the goodies made and collected that are going inside, I'll take group photos :D 

Shark bag - this isn't a Christmas gift either, but I wanted to make a pouch for a young lad - I think he'll like this shark *chomp* :D

All 7 of these bags will be posted to the Bag It challenge, and the owl pieces and Eunice bags will go to the Ho Ho Ho linky party for November :)  I'll post the puppets to Celtic Thistle Stitches New to Me linky for November - both designs - the hand and the finger - are new to me, and I think I did a nice job on them, so I think they deserve a New to Me designation :)   I have snowman hand puppets, wallets, little girl finger puppets, and more Eunice bags finished that I need to photograph ... Christmas sewing is almost complete :)   Christmas shopping is almost done as well - I'm hoping to have time to finish up some UFO projects in December, rather than frantically sewing on Christmas Eve to finish things up, hehe.  It would certainly be a first :D

Saturday, September 17, 2016

Ho Ho Ho and On We ... Snowman :)

This month I'm hostessing the Ho Ho Ho and On We Sew linky party, so you've dropped by at a great time!  ;)   Ho Ho Ho is a fun party for getting organized and prepared for Christmas :)   I've written up a tutorial for a cute (I think!) project for you to try out.  BONUS - there's a prize available, and anyone who posts a project to the linky party is eligible to win it.  It doesn't have to be a snowman bag - it can be a Christmas gift, or a Christmas decoration - think Christmas prep!  :)
   
The sponsor of this month's giveaway is the lovely Stephanie at Elephant in my Handbag.  She's offering a one-off 10% discount on purchases made during the term of the September link party (00.00GMT Sept. 18 to 23.59GMT Sept. 30) using code HOHOHO - sweet!  The link to the party is at the very bottom of this post :)


The prize for the linky party winner is awesome - thank you so much, Stephanie!  One of you link party uploaders will get this adorable pattern - YAY :)


I decided, for my project, to do something that would work for Christmas, and for the winter season in general.  I hope you like it - I had great fun making it.  The first version was laughable - I had to rejig my measurements and redo it so it wouldn't look ... ummm ... doofy :D

And here he is - a fully lined snowman drawstring gift bag :)  He finished to about 10 1/2" wide x 16" tall - just right for a nice box of really GOOD chocolates ;)  He doesn't take very long to work up - and of course, you can change him up to make him work just right for you :)


Snowman Drawstring Bag - A Tutorial :D  (measurements in inches/Imperial, listed width x height.  Seam allowance 1/4")

Ingredients:
- 2 X 11 x 12 outer main (white)
- 2 X 11 x 5 outer accent (black)
- 2 X 11 x 16.5 lining (I used grey)
- 60`` black rattail (I used 2mm) or thin cord
- scrap orange for nose - about 4 1/2" x 2"
- 7 X 1" buttons (I used all black)
- scrap of lightweight sewable iron on adhesive, about 2" x 4 1/2" (I use Heat n Bond iron-on adhesive - Sewable)
- thread - I used white, black and orange
- nose - either draft a carrot nose about 4" long, and 1.5" wide at the fattest end, or you could do what I did - I printed off the pattern from this mug rug, and enlarged it to 125% :)
- a round plastic garbage can or plate
- marking pen of your choice - I use those Frixion erasable ones

Because there so many tutorials available online I'm not going to go into detail about basic drawstring bag construction.  Instead, I'll try to show you how I snowmanified (new word :D) a run of the mill handmade bag to make it more Christmassy and Ho Ho Ho-y :D

Basically ...


Stitch outer accent to top of outer main, for both front and back.


Draft or trace a nose onto the paper side of the iron on adhesive, and iron it (follow directions on package) onto the back of the nose scrap (don't forget that whatever you trace onto the adhesive will be reversed on the right side of the fabric).

On the right side of the outside front, arrange the buttons and nose until they're the way you like them - I mark the placement with a Frixion pen and then attach the buttons and nose on top of the marks.   When placing the face pieces, leave about 2" empty on the 2 sides and the bottom, and about 3" at the top.

Remove the paper backing from the nose, iron it in place then stitch around it with orange thread with a small tight zigzag stitch.  I stitch around it twice for a nice look.  Sew the buttons in place.   You may need to carefully press the front piece a bit if it got any scrunchies/wrinkles while you were working on it.  Mine sure did, LOL.

Stitch lining pieces to outside at the top, press.  I press the seam towards the back on one piece, and towards the front on the other - it helps minimize the bulk at the seam intersection when the side seams are stitched.


Lay your front and back pieces on top of each other, RST (matching the faces at one end and the lining at the other).  Line up the corners of one end nicely.


Place the can or plate at each corner and trace around it.


Pin in a few places so the pieces don't shift.


Trim on the marked lines, then repeat on the lining end.


Layer both pieces again, RST and pin together.  You're going to stitch around the entire piece, leaving 3 openings.  Leave about 3 or 4" on a straight side of the lining to turn the bag right side out. Leave a 3/4" opening on each side seam at the black section for the drawstring:  measure and mark 1/4" and 1" up from the seam where the two front pieces are stitched together.  Do this on both sides.   If you're having a hard time picturing it, look here - step 4.  She measured up 1 1/4" and 2 1/4" from the seam - YOU will measure 1/4" and 1" because we want the casing near the very bottom of the black section, near the face.


Stitch around the entire bag, leaving the 3 openings as above.  Turn right sides out, press nicely, stitch opening in lining closed, tuck lining into bag and scootch and wiggle it around until it's seated nicely, then press it again. My curved seams were very curvy with no sharpies - I guess I didn't press very well, as I see some angles on his chin that shouldn't be there!

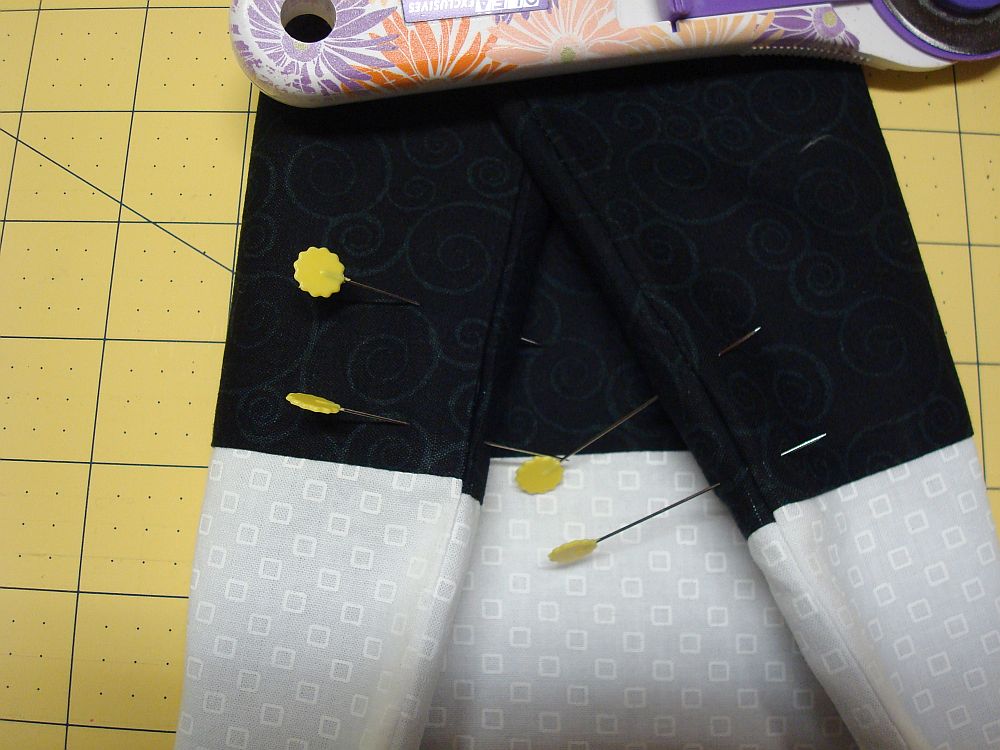
Stitch 2 parallel casing lines where the openings are in the black section.  I've marked the openings on either side of the accent piece with pins to make them easier to see when sewing.  If you go to the In Color Order tutorial - steps 11 and 12 explain this nicely.

Cut the 60" of rattail in half, thread each half through the casing in opposite directions, and tie off the ends so they don't escape and hide in the casing :D  I added orange pony beads to the ends of my rattail - just for fun :D  As soon as I added the ties, he ran and hid ... but not very well!  ;)

I hear that snowman like to be outside, but this is ridiculous!  :)


OK - that's it for my tutorial - I hope you like my bag, and I hope my instructions (and links to instructions) are easy enough to understand.  Give me a shout if I've missed anything, or made a goof!  If you make a bag, PLEASE please send me a picture! :)

Speaking of goofs ...  here's my first try at this project - remember I said he was doofy?  It's like he got in line 3 times when Old Man Winter was handing out foreheads.  Silly snowman!  :)

Forehead snowman :D


Before I close off, I wanted to give a shout-out to the lovely sponsors of the Ho Ho Ho linky party - they're very generous to our stitching community, and deserve a big thank you, and a visit!

https://www.etsy.com/uk/shop/nicoledebruin
  
http://www.needcraft.co.uk/
http://www.elephantinmyhandbag.com/http://www.tikkilondon.com/http://www.japancrafts.co.uk/http://www.rylandpeters.com/
 
https://www.etsy.com/uk/shop/summersville
https://www.etsy.com/uk/shop/AngieAttwoodTextiles

http://simplysolids.co.uk/
http://sewsweetness.com/

 
http://www.tina-francis-tapestry.co.uk/


An InLinkz Link-up

Posting to New to Me 2016 @ Celtic Thistle Stitches :D
Also posting the tutorial to Bag It from Elm Street Quilts tutorial linky :)

LinkWithin

Related Posts with Thumbnails