Wednesday, August 31, 2016

Duck Duck Goose ... no ... Duck Duck Duck!

Despite many challenges presented by the horrible Lizard Lock downloadable version of this pattern (Burda 7754) I was able to make this little guy for a Christmas present for one of the greats :)  I used a store bought pillow form and I'm going to add some extra stuffing to it so it will fill out the cover more fully, but other than that I'm really pleased with how this guy turned out!  Of course, things didn't go smoothly ...


... yep, during construction I realized that I had stitched the head, 2 feet and tail with the right side facing the zipper side of the pillow :D  Froggy stitching ensued, appendages were rearranged and reinserted, and ...

Burda 7754 - duck pillow face :D

Burda 7754 - duck pillow DUCK BUTT!

Burda 7754 - duck pillow finished :)

Burda 7754 - duck pillow - which is my best side?  ALL of them!  ;)
Now I can cross this item off of the Christmas To Do list!  I like doing theme gifts, so along with this guy, I'm including (NAYY on the links):
- Lemon the Duck book (this page was actually the inspiration for this gift)
- Rubber Ducky (this is still on order - I hope it arrives soon :D)
- 5 Little Ducks board book
- ducky cookie cutter :D

Rubber ducky, you're the one ... you make bathtime lots of funnnnnnnnnnnnnnnn *sings* *badly* :)

And another recent Christmas gift finish ... beanbags!  Here's the bag I made to hold them ... along with the book I bought to go with them :)

Letter bean bags, storage bag and ABC book - gift set :)
... and here are the bean bags :)

Letter bean bags :)
These two gifts are being posted to the Ho Ho Ho and On We Sew linky party for August - I made it just in the nick of time!

And one last quicky - there's a tutorial online that I've seen for a while and have drooled over.  I finally got around to trying it out, and I'm very glad I did!

Train Case - tutorial from Choly Knight :)


It's a "train case", but this one is a simple version - it's made without having to stitch round seams or do intricate stuff - it's basically a boxy bag done easily with strategic zipper placement to give it the traditional train case shape :)  I had a bit of a problem with the thickness of the French seams (used to hide all the raw edges) and I made a few minor changes to the construction (to eliminate the raw edges around the zipper) but overall - WOW.  Useful, cute, and simple - that's a win/win :)  Thank you Choly Knight for the tutorial!  She does awesome fun designs, gives use lovely free patterns/tutorials, and writes books (I have 3 :D) - she's a woman of many talents :)  This project will count towards the New to Me linky party for August, and also as #22 in my so-far-not-very-successful attempt to do 52 new projects in 2016, lol.  

Posting to:
Ho Ho Ho and On We Sew for August :)
New to Me for August :)

Friday, July 29, 2016

Rush rush rush!

Hubby and I are headed Stateside for a wee vacation tomorrow, and I've been running around like a madwoman trying to get things organized and ready :D  My Ho Ho Ho and New to Me post will be short and sweet for July - I have laundry and packing to get done (along with printing off Joanns coupons, LOL) and I still need to finish my USA Shopping List (yes, it has capitals - it's an Important List to me!) :D


First up is my New to Me project for July -- tutorial here :)  This worked out pretty well, but next time around I won't add quilting to the pockets (back and front) AND the bag body - it's too thick, and sinks in to itself a tiny little bit.  I'll quilt the front and back, but not the pockets - that should solve the problem.  It's an easy make, and I have an extra set of strap hardware (that sounds rather fancy, but it's just a D ring and a plastic tri-glide thingy, bought on sale @ Fabricland, lol) and will make another bag when I get back :) This counts as #21 in my 52 in 16 efforts - I need to step up my pace!  21 in 7 months means I still need to do 31 in 5 months - yikes!

Here's a quick finish I threw together yesterday - it's part of a Christmas gift - I sized it for the item that's inside :D  I managed to calculate the right height for adding the name applique - that doesn't always work for me, lol.  

OK gotta run - I have a million things to do!   We're going on a boat tour on Sunday and my brother and sister-in-law are driving down from Osgoode, Ontario to meet us in Alexandria Bay, NY - we're all going on the tour together :)  Mickie and dear sweet Seamus - I'm so sorry that we won't be able to see you this trip - I hope Shayme feels better soon, and we'll come down another time :)


Posting to New to Me for July ... and Ho Ho Ho and On We Sew, also for July (OMG check out Heidi's rug tutorial - totally awesome!) :)


Monday, July 11, 2016

Photography for no particular reason :D

... I'm working on a zipper bag (SURPRISE!!!!!!!!!!!) today - I got it prepped (up to the 'zipper is installed' stage) and will take it upstairs for some beadwork, which I hope to do tonight.  I thought I'd take a couple of pictures of how I get things packaged to go upstairs - aka process pics :D  Keep in mind I'm in my dungeon sewing room, so lighting is a challenge!


Here are the beads I'm using to embellish the bag.   The glass butterfly bead middle bottom has sharp edges around the holes so I worried that they would shred my thread.  The seed beads (directly above) will go on either end (I have extras there in case I drop a few in the couch, haha) to protect the thread.


 I use tiny little organza bags to keep my little bits and bobs together for sewing projects - I threw the beads in here for their long travel by air up to my first floor :D  Corralled, they are  ;)


I miscut the lining fabrics and had to piece one to make it big enough I made a Design Decision and pieced the lining to include the front fabric - for fun :)  You can also see, top left, a little Japanese cotton ribbon that I stitched on for extra kick :D


 It's a sewing themed ribbon - I think it came from Quilt a Bag in Markham :)
This is my carry case for beading projects - you can see my beads, beading needles, embroidery scissors and thread tucked safely inside :)  


This is the outside of the case - it's an eyeglass case given to me years ago by a friend - it's perfect for crafting projects.  Nothing in it is going to fall out or get lost, and it's cute to boot :)  Thanks, No Blog Chris B :D


I hope that when the recipients get their bags and notice the beading (which is usually very minimal), they're surprised and pleased!

Have a great day - I have aquafit tonight with a friend (hi, Miss Amanda) and her husband (hi, Mr. Tony) ... and I'm trying a new recipe for supper - Black Beans and Rice - wish me luck :D

Sunday, July 10, 2016

More finishes - it's going to be a stash-bustery July :)


First up - Retreat type zipper pouch, made with scraps of basketball fabric a sewy no-blog friend gave me :D  Hey Chris - I used up every inch of the fabric!

Close-up of the zipper pull - a basketball net :D


I really like making these Retreat bags (I prefer them without the frame, even though I have lots of frames!) - this one, although you can't see it, has tiny seed beads stitched into the center of a bunch of those flower patches :)


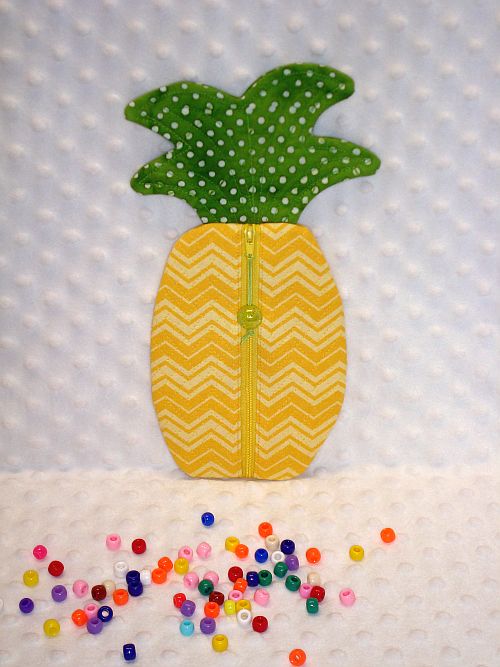
You've seen me make a pineapple bag before (well, you didn't see me MAKE it, but you did see the finished version, LOL) - when I made the first one it worked out so well that I gave it away as a gift, and kitted 2 more to stitch up.  And now - the 2 more are stitched up, ready to be gifted as well :)  Tutorial here, pattern here :)  What do you think - pink next ... or purple, maybe?


And one last finish to post for now - I follow a site called SewCanShe - each month Caroline's readers pick an "untutorial" that we would like Caroline to write an actual tutorial for - she lets us vote, then when the decision is made, she -- writes up a tutorial!   June's project was a Peek-a-Boo pouch with two vinyl pockets (one with a zipper closure.   I took some liberty with the closure, changing it to a magnetic snap ... which then necessitated me fixing a rather glaring booboo - the ugly back of the magnetic snap was dead center on the outside, HAHA.  A few stitches on a crocheted flower I had in stash - and booboo is hidden :)  See the little Eiffel Tower in the last picture?  That was my first booboo - I cut the holes for the magnetic snap ... in the wrong spot, so had to cover up the hole.  I stitched a little tag over top, and now it's a Design Decision :D  My first new to me for July, and #20 of 52 in my "52 in 16" quest :D


Have a great day - I'm headed to a friend's house for a get-together - I met the two ladies online, in a chatroom!!!, back in '97 for one of them, and '99 for the other.  We've been friends since then, and we try to get together every couple of months :D  Actually we'd get together more often than that, but with 3 couples, 10 children and some greats between us, scheduling is somewhat difficult, LOL!

Saturday, July 9, 2016

Bug scraps - be GONE!

Late last month I grabbed a small container of scraps from my craftroom and decided to use them all up in July.  They were all bug/critter fabrics - mostly just bits and pieces, and I thought that using upcycled denim from thrift store jeans and heavy duty canvas from hubby's work pants, would be the perfect statement to go along with the use of the scraps :)  I got them all finished rather quickly - it's almost as if I've made zipper bags before!  ;)  The last bag is my favourite - I don't like the product samples my dentist gives me after each check-up so I donate them :D  The goodies have now been tucked inside the tall denim zipper bag, and hopefully, someone will make good use of them :)


Friday, July 8, 2016

... and this is just ONE reason why I love my neighbour :)

Our kitchen - 5:00 p.m. (ish).  I was making supper (aka taking containers of leftovers out of the fridge :D).  Phone rings, hubby answers it, then I hear ... "OK, I'll tell her."  "Hey Sandra - that was Maria - she says that if you grab a plate and go to her fence ..." - at which point I grabbed a plate and ran like the wind. not listening to anything else he had to say :D   I knew what she was baking today, so I knew what was coming!  Two minutes later I'm in her kitchen (after receiving kisses from Xena the dobie, who greeted me at the fence), and she's carving us off a hunk of homemade zucchini cinnamon cake, freshly baked, and frosted by her son Stelio.  LOOK AT THIS CAKE!   I put the butter in the photo to give you an idea of how big these pieces are - that's a dinner sized plate - not a little dessert plate!  I've already eaten my piece, LOL.  Hubby got called out on a service call before he could eat dessert - his piece may be in mortal danger, IYKWIM :D  I love my neighbour - and not just because she bakes us treats :D  She's rather ... ummm ... raunchy ... ummmm ... dirty ... saucy ... - it's like seeing a younger ME over the fence - one that's a better cook, lol!  We get along very well - I'm so so lucky!


I'm on my touch screen laptop and can't figure out how  to move this photo up so it's beside the text instead of below it.  I also can't figure out how to get rid of the stupid pop-up keyboard that keeps showing up - this is a laptop, not a tablet, and I have a full keyboard, but for the life of me I cannot figure out how to get rid of it!  Annoying beyond belief - especially since it just started showing up a couple of months ago out of nowhere, and none of the solutions I find online, work to elininate it. Sometimes, technology is a royal PITA!   But then I eat cake and forget my problems :D  Problem solved, finally - so NOW I can eat cake :D


Thursday, July 7, 2016

Red Riding Hood and superheroes :)

Here's a Red Riding Hood gift set that I finished this morning - a simple zipper pouch with a themed drawstring bag to hold it :)  All supplies from stash, yay!


Red Riding Hood drawstring gift bag ...


Red Riding Hood gift set - zipper pouch and drawstring bag :D

Here's a closer picture of the bag (from my dreary basement, lol) :)

Close-up of the Lecien RRH print :)

And another finish - a Superhero (fabric from Joanns) bag - this, along with the RRH set ^^, is being donated for an upcoming fundraiser :)

Retreat bag - lined with royal blue TOT fabric :)

Close-up of the zipper pull - I'm not sure if this is an actual superhero design (I got it on Ebay), but it looks pretty hero-ish! :)


Friday, July 1, 2016

Last of the June finishes :D

Some of these are projects that were finished in May but I didn't get around to getting pictures for my "Completed" file :D  I used up, at a rough estimate, 37 zippers in June (along with 12m fabric, 10m ribbon and 10m rattail).  However, my final "zipper out" tally was closer to 18, as I ended up buying 19 during the month :D  Hey - a girl who loves zippers can't turn down a 50% off sale ... especially when the fabric store has increased the price of zippers substantially (30% on some - OUCH!) and I was snatching up stock that was still priced at the old, lower price :D


It's no wonder I spend so much time in the basement - we had a lot of hot days in June, and the furnace and air conditioner are in my sewing dungeon, so it's way cooler down here than it is upstairs.  So much so, in fact, that I frequently have to put on a sweatshirt and socks to be able to spend time in here, haha!

Happy Canada day to my Canadian friends ... and Happy 4th of July to my American buds!  It's funny that we're sharing a long weekend to celebrate our countries' birthdays, but they're on opposite ends of the weekend - Friday - Sunday ... and Saturday - Monday :)  Stay safe!


(photo source)

Thursday, June 30, 2016

Strawberries and farm animals and vinyl flexation :D

Strawberry zipper pouch - tute here :)
Here's a new to me (19 of 52 in 16) project that worked out so nicely that I decided to put it in my Christmas box as a gift :)  It actually has red seed bead "seeds" but I couldn't get a clear photo of them - they do give the bag a pretty little glitter!  I think I'll tuck strawberry lip gloss and Strawberry Shortcake stickers inside, making it a a sweet gift for a young lady :)   The tutorial for the bag, along with the strawberry applique pattern, is from Jennifer Heynen (aka Jennifer Jangles) @ JenniferJangles.com :D  The little inset picture on the right, is a close-up of the strawberry zipper pull ;)

Farm finger puppets - tute here :)
Another Christmas gift finish --- this was a tiny little finish, but it was the last item I wanted to make for this specific gift, so I'm really happy to have all the pieces completed, ready to be "bagged and tagged"  :D   The pattern for these little farm finger puppets is here :)


The gift consists of a Cargo Duffle bag with some goodies tucked inside.  There's a set of farm animal hand puppets and a book to go with them ... they were posted here.  I made a drawstring bag to hold the puppets and book ... it's posted here. The finger puppets are ^^ above ;)  What do you think - is this a cute gift for a young lad?  I think (hope) so :)

Oh!  One last new to me (18 of 52 in 16) project for June - a vinyl flex frame bag!  I've made vinyl bags, and I've made flex frame bags, but combining the two - that's a first!  The tutorial is here - I have more of these cut out already - they're a great way to use up fabric scraps!  Next time around I'll put a gentle curve in the bottom - it was impossible to get the square corners completely turned RSO :D


Posting to:
New to Me for June 2016 and Ho Ho Ho and On We Sew for June 2016 :D


Monday, June 20, 2016

Happy Fishy Drawstring Bag Day!

Friday was Pineapple Day, and today is a new and fun theme day, lol.  Did YOU remember to celebrate Fishy Drawstring Bag Day today?  No?  Well then pull up the tutorial (which was created to take care of an UNtutorial problem :D) that Caroline from SewCanShe.com was sweet enough to write for us - and make yourself a fishy bag :)


I made the simplest version with no embellishments - I wanted to try out the pattern and wanted instant gratification, LOL.  It worked out perfectly, and it's a SIMPLE sew.  I used about .8m fabric, and 2m rattail (instead of fabric drawstrings) - nice stash busting!  It's unlined, so I zigzagged all the raw edges to give it a nice finish.  I appliqued an eye on either side, so it's reversible ... in a manner of speaking, haha.   I'm SO very pleased with this bag, and glad that it was chosen for May's Untutorial project - I voted for it myself :D THANK YOU CAROLINE for your work and for sharing it with us!

Bonus points for me, as it counts as #17 in my quest to try new designs in 2016 (52 in 16) - plus I'll be able to post it to Fiona's New to Me for June - I am ON A ROLL :)  I'm going to print off the pattern at 50% to see how it looks as a smaller bag --- this one measures about 28" long from mouth to tail, and about 18" wide, so a half size bag would be cute to hold a kiddy item :)

Posted to New to Me for June, @ Celtic Thistle Stitches :)

Friday, June 17, 2016

Happy Pineapple Day!


Pineapple zippy - front :)
Pineapple zippy - back :)
If Pineapple Day isn't an official holiday, it should be ... to honour my latest finish :D  Tutorial is here - pattern is here :)  I did change the pattern up a bit - I quilted the outside in a cross-hatch design (which doesn't really show because of the zigzag print, hehe) and eliminated the embroidered design from the original.  The bag worked out perfectly, and tomorrow she's headed via snail mail to ******, who has a birthday coming up :D  I've tucked a little notebook, a key cap cover and a book of stamps inside as a bonus :D  I already have 2 more of these little sweeties cut out ready to make!  This counts as #15 in my 52 in 16 attempt :D

Pocket Tote Library Bag
Here's another new one from this week - a simple Pocket Tote Library Bag.  I spotted the tutorial online and thought it might make a good stashbuster project - making bags to send to the counselling center, with the added bonus of busting some fabric :D  I used leftover corduroy for this one and decided to quilt it. Next time, self, don't quilt corduroy.  That was definitely not necessary, and made for some mighty thick seams, lol.  I'll be making more of these - it's a simple bag, and very cute :)  It's fairly small, though - 12.5w x 11t x 3.5d - that would suit a younger kid.  I'll upsize a couple of inches in each direction to make it more versatile, for older kids.    Yay for #16 in 52 in 16 :D

Here's part of a Christmas gift I got finished earlier this month - I made it to hold the farm hand puppets I made last month.  I tucked an Old MacDonald book inside, and I have some farm finger puppets printed out to make, which will finish the gift off.  When I get them done I can post this to June's Ho Ho Ho and On We Sew linky party :)


Pineapple bag posted to Celtic Thistle Stitches New to Me for June :)


LinkWithin

Related Posts with Thumbnails